Canna lilies are vibrant, tropical plants that bring a touch of beauty to gardens with their lush foliage and striking flowers. Despite their impressive appearance, these plants are surprisingly easy to care for and can thrive in a variety of climates.
We will explore everything you need to know to cultivate and maintain healthy, flourishing canna lilies.
Overview Of Canna Lily
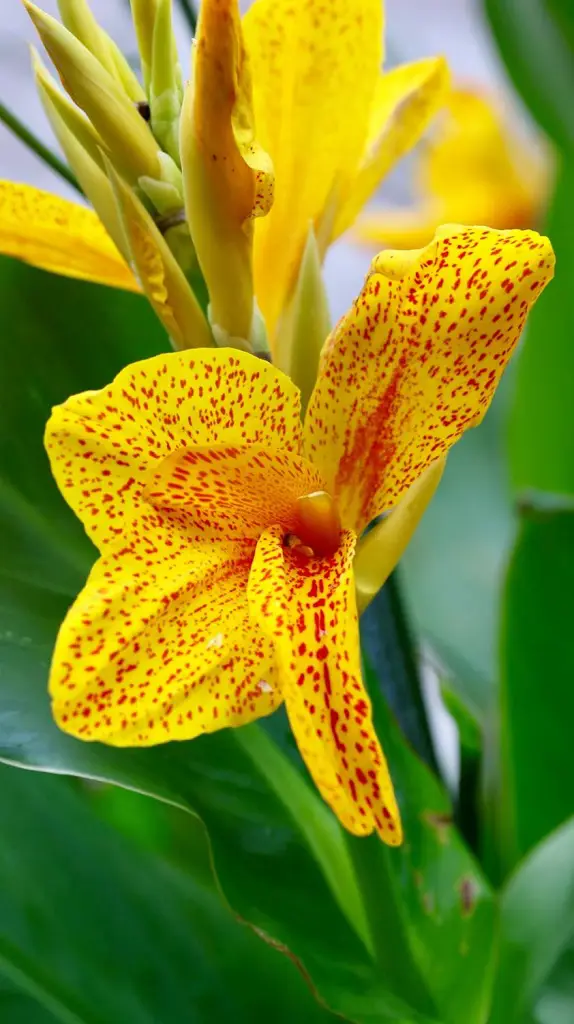
Canna Lilies are known for their vibrant and colorful blooms. They are tropical plants and come in various colors that enhance the beauty of your garden. They are one of the popular choices among gardeners.
The general overview of this flower is as follows:
Common Name: Canna Lily, Canna
Botanical Name: Canna
Plant Type: Bulb
Family: Cannaceae
Mature Size: 1.5-10 ft. tall, 1.5-6 ft. wide
Sun Exposure: Full
Soil Type: Moist
Soil pH: Acidic, neutral
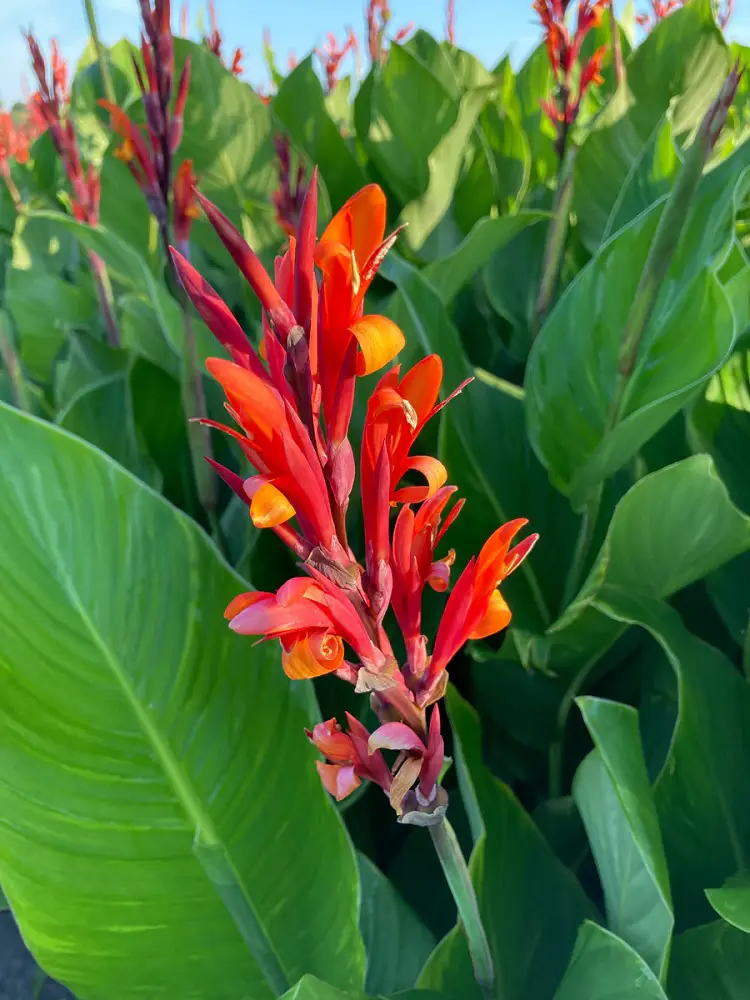
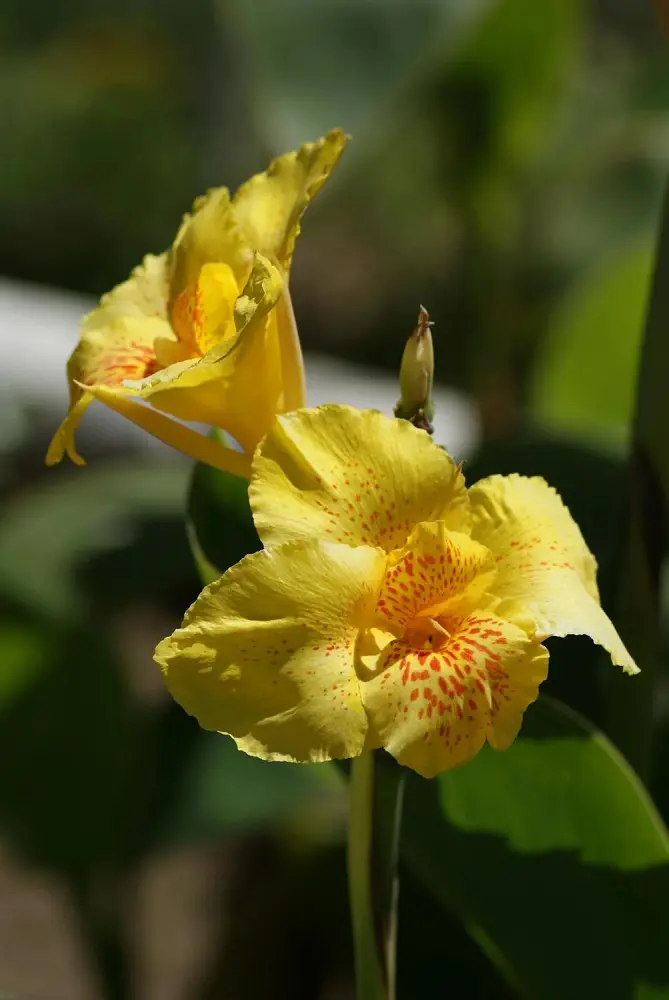
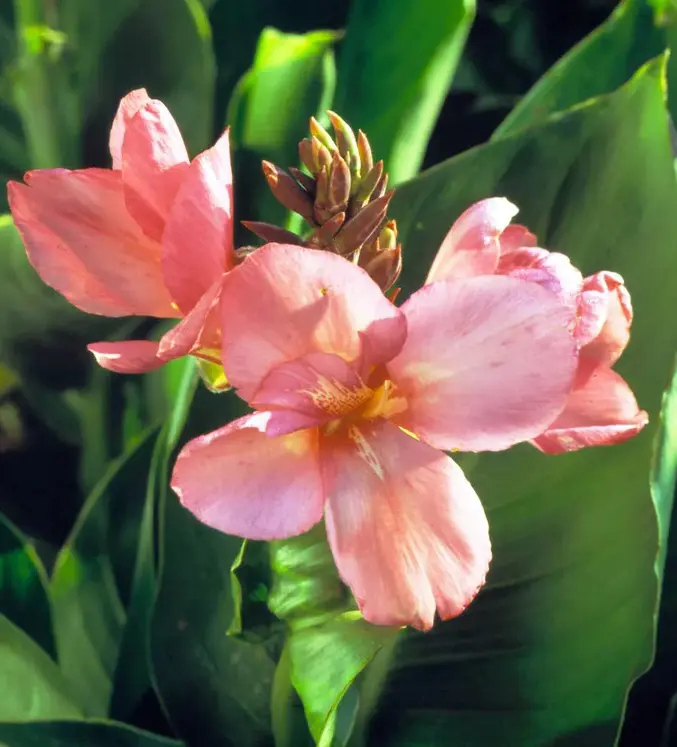
Flower Color: Orange, Pink, Red, White, Yellow
Season Features: Summer Bloom
Propagation: Division, Seed
Zones: 6a-10a (USDA)
Special Features: Attracts Birds, Fragrance, Good for Containers, Low Maintenance
Native Area: Caribbean, East and West Africa, Central and South America
Best Time To Plant Canna Lily
The best time to plant canna lilies is in the spring after the last frost has passed and the soil has warmed up.
Plant canna lilies in the spring when the danger of frost has passed. This is typically when temperatures consistently stay above 50°F (10°C). In many regions, this means late March to early May.
However, ensure the soil temperature is at least 60°F (15°C) before planting, as canna lilies prefer warm soil to establish their roots and start growing.
Some of the essential tips for planting canna lilies to grow healthy are:
1. Choose the correct location:
Firstly, while planting these cannas you should choose the right location. Select a spot that receives full sunlight. Cannas can tolerate partial shade, but full sun helps in the best growth and flowering.
Choose a location sheltered from strong winds to prevent the tall flower stalks from being damaged.
2. Prepare the Soil:
Cannas like soil that drains well so their roots don't get soggy. If your soil is heavy and clay-like, mix in stuff like compost or peat moss to help the water flow better.
Enrich the soil with compost or a balanced slow-release fertilizer to provide the necessary nutrients for growth. This way, your Cannas will stay happy and healthy.
3. Plant at the Right Time:
Plant cannas in the spring after the last frost date when the soil temperature is consistently above 60°F (15°C).
Make sure the soil is warm enough to promote healthy root development.
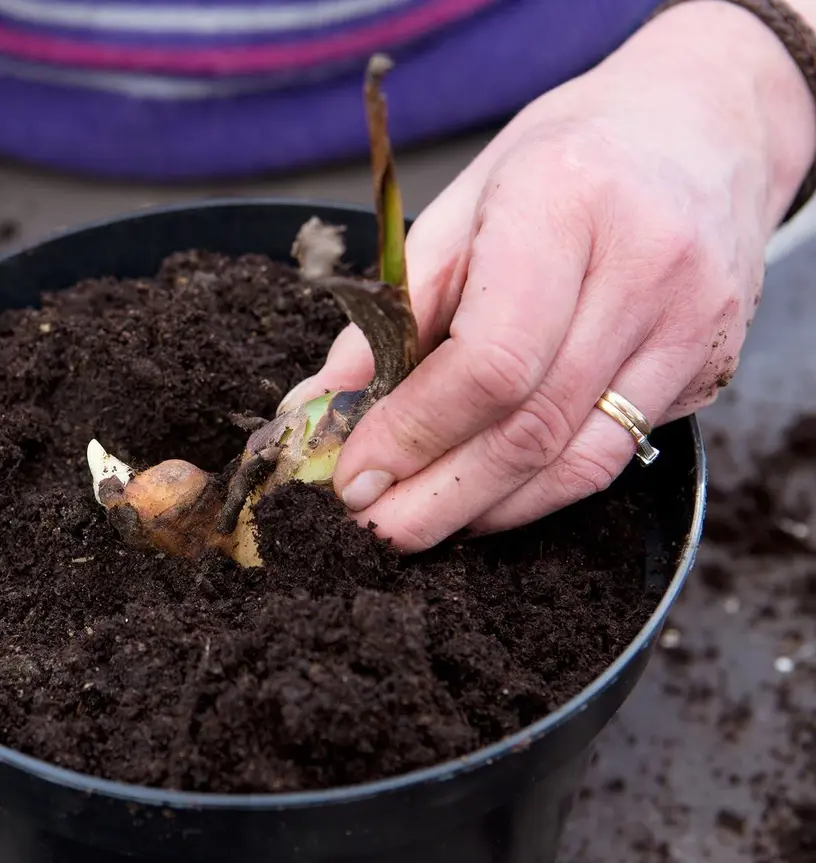
4. Planting Depth and Spacing:
Plant canna rhizomes 4-6 inches deep with the eyes or growing points facing upwards.
Space the rhizomes 1-2 feet apart to allow for sufficient airflow and room for growth. This spacing helps prevent disease and promotes healthy growth.
5. Watering:
Water the rhizomes thoroughly after planting to settle the soil and encourage root development.
Keep the soil consistently moist but not waterlogged. Cannas thrive in moist conditions but can suffer if the soil is too wet or too dry.
6. Mulching:
Mulching means putting a layer of material like wood chips or leaves on top of the soil around your plants. It helps keep the soil moist, prevents weeds from growing, and regulates soil temperature.
Apply a 2-3 inch layer of mulch around the plants to retain soil moisture, regulate soil temperature, and suppress weeds.
Use organic materials like straw, wood chips, or shredded bark.
7. Fertilizing:
Use a balanced fertilizer during planting and apply additional fertilizer during the growing season to support growth and blooming.
Fertilize every 4-6 weeks during the growing season for best results.
8. Staking:
Provide support by staking to prevent the flower stalks from bending or breaking.
When we talk about propagating Canna Lilies, it means creating new plants from the existing ones. It is done through the division of their rhizomes.
The best time to propagate canna lilies is in the spring, just before or as new growth begins. Alternatively, you can divide and propagate canna lilies in the fall after they have finished blooming and before the first frost.
Steps for propagating Canna Lily:
1. Prepare the Tools and Site:
Make ready a sharp knife or garden spade, garden gloves, and a container with water. Then, choose a sunny location with well-draining soil enriched with compost or organic matter.
2. Dig up the Rhizomes:
Carefully dig around the base of the canna lily clump to avoid damaging the rhizomes. After that, lift the clump out of the ground using a garden fork or spade.
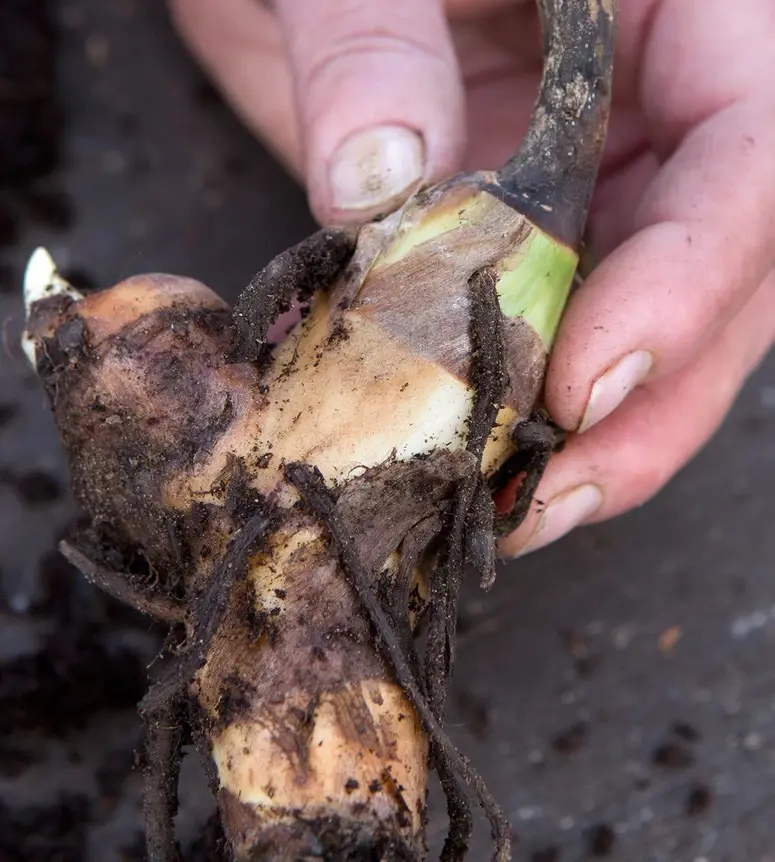
3. Clean and Inspect the Rhizomes:
Shake off excess soil and gently wash the rhizomes with water to make it easier to see where to divide them. Inspect the rhizomes for healthy eyes or growing points. Discard any rhizomes that are soft, mushy, or show signs of disease.
4. Divide the Rhizomes:
For this part, you can divide the rhizomes using a sharp, sterilized knife or garden spade. But make sure that each section should have at least one or two eyes or growing points. Then, make clean cuts to avoid damaging the rhizomes and reduce the risk of disease.
5. Plant the Divided Rhizomes:
For this, you should dig holes about 4-6 inches deep for the rhizomes. Place the rhizome sections horizontally in the hole with the eyes facing upwards. Then, space the rhizomes 1-2 feet apart to allow for proper growth and air circulation.
6. Watering and Mulching:
Water the newly planted rhizomes thoroughly to settle the soil and encourage root establishment. Apply a 2-3 inch layer of mulch around the planted rhizomes to retain moisture, regulate soil temperature, and suppress weeds.
7. Care After Planting:
The most important thing is to take care of the plant. You should now keep the soil consistently moist but not waterlogged. As the plant grows, provide balanced fertilizer during the growing season.
It's essential to look after your Canna Lily to help it bloom well. Considering various factors is important for its healthy growth and flowering.
Some of the ideas for caring for Canna Lily are mentioned below:
1. Sunlight:
Plant canna lilies in a location where they receive at least 6-8 hours of direct sunlight daily. They can tolerate partial shade, but full sun promotes the best growth and blooming.
2. Watering:
Cannas prefer consistently moist soil. So, you should water them deeply once or twice a week, depending on rainfall and temperature. While cannas like moisture, ensure the soil is well-draining to prevent waterlogging and root rot.
3. Mulching:
Apply a 2-3 inch layer of organic mulch, such as straw, wood chips, or shredded bark, around the base of the plants. This helps retain soil moisture and suppress weeds. Further, mulching also helps to regulate soil temperature, keeping it cooler in summer and warmer in winter.
4. Fertilizing:
Use a balanced fertilizer to provide essential nutrients. Apply fertilizer every 4-6 weeks during the growing season. You can also use organic options like compost or well-rotted manure to enrich the soil.
5. Pruning and Deadheading:
Regularly deadhead spent flowers to encourage continuous blooming and improve the plant's appearance. In late fall, cut back the foliage to a few inches above the ground after the first frost to prepare the plants for winter.
6. Pest and Disease Management:
Keep an eye out for common pests such as aphids, snails, and slugs. Use insecticidal soap or organic pest controls as needed. Also, make sure of good air circulation around plants and avoid overhead watering to prevent fungal diseases.
7. Support and Staking:
You can use stakes to support the flower stalks and prevent them from bending or breaking in strong winds.
8. Winter Care:
After the first frost, dig up the rhizomes, let them dry for a few days, and store them in a cool, dry place in peat moss, sand, or sawdust. And, if winters are mild, cannas can be left in the ground. For this, apply a thick layer of mulch to protect the rhizomes from potential frost.
9. Dividing Rhizomes:
Divide the rhizomes every 3-4 years in the spring to prevent overcrowding and rejuvenate the plants.
10. Soil Quality:
Ensure the soil is well-draining and rich in organic matter. Amend heavy clay soils with compost or peat moss to improve drainage and fertility.
How To Store Cannas For Winter
Storing canna lilies for the winter is essential in regions with cold climates to protect the rhizomes from frost damage. Here’s a step-by-step guide on how to store canna lilies for winter:
1. Wait for the First Frost:
Allow the first frost to hit your cannas, which will cause the foliage to die back naturally. This means the plant is going into a rest period and is prepared to be lifted from the ground.
2. Cut Back the Foliage:
Using sharp garden shears or pruners, cut the foliage back to about 4-6 inches above the ground. This makes handling and storing the rhizomes easier.
3. Dig Up the Rhizomes:
Dig around the base of the canna plant with a garden fork or shovel, taking care not to damage the rhizomes.
4. Clean the Rhizomes:
After digging, shake off excess soil and rinse the rhizomes with water to remove the remaining dirt. Then, allow the rhizomes to dry in a well-ventilated area out of direct sunlight for a few days to prevent mold and rot during storage.
5. Prepare the Rhizomes:
Inspect the rhizomes for any signs of disease or damage. Then, discard any soft, mushy, or diseased rhizomes. Cut the rhizomes into sections if they are large.
6. Choose a Storage Method:
Place the rhizomes in a box or crate filled with slightly damp peat moss, sawdust, or vermiculite. Ensure the rhizomes are not touching each other to promote air circulation. Alternatively, you can also store the rhizomes in paper bags or cardboard boxes with some shredded newspaper or dry leaves to absorb excess moisture.
7. Store in a Cool, Dry Place:
Store the containers in a cool, dark, and dry place where the temperature stays between 40-50°F (4-10°C). Avoid storing the rhizomes in places that may freeze or where temperatures fluctuate widely.
8. Check Timely:
Check the stored rhizomes periodically throughout the winter for signs of mold, rot, or dehydration.
There are many factors to be considered to make canna lilies bloom.
First of all, it is important to provide the right care and growing conditions.
After that plant them in a location that gets at least 6-8 hours of direct sunlight daily, as they thrive in full sun.
Use well-draining soil enriched with organic matter and keep the soil consistently moist without letting it become overwatered.
You should also fertilize the plants every 4-6 weeks with a balanced fertilizer or organic compost to supply essential nutrients.
Along with this monitor for pests and diseases regularly to keep the plants healthy.
In colder climates, dig up the rhizomes after the first frost and store them in a cool, dry place until spring, while in milder climates, leaving them in the ground with a protective layer of mulch suffices.
Divide the rhizomes every 3-4 years to prevent overcrowding and rejuvenate the plants that promote growth and abundant blooms.
Canna lilies come in a variety of beautiful and unique cultivars, each offering different colors, sizes, and foliage patterns. Here are some varieties of canna lilies:
1. Tropicanna Canna Lily
Tropicana canna lily consists of striking variegated foliage with shades of purple, red, green, and yellow. Along with this, it boasts bright orange flowers that can grow to heights of 4-6 feet tall.
2. Pretoria Canna Lily
Pretoria canna lily is a large, lofty variety that flaunts green leaves with yellow-striped, and sizable orange blooms. It grows 6 to 8 feet tall.
3. Intrigue Canna Lily
This type of Canna Lily is mainly known for its beautiful leaves, but it also produces orange flowers in late summer. The tall foliage, reaching 7 feet, features slender, burgundy leaves that create a striking appearance.
4. Tropical Rose Canna Lily
It is a small type of plant that produces large bunches of pink flowers. It reaches a height of 2½ feet.